![]()
If you are a homeowner, you know that ceiling fans can be a great addition to any room. They provide circulating air which can make a room more comfortable and they can also help to save on energy costs by keeping the room cooler in the summer and warmer in the winter. But if you’ve ever tried to install a ceiling fan, you know that the wiring can be confusing. That’s where a Hampton Bay ceiling fan wiring diagram comes in handy. In this blog post, we’ll show you how to use a Hampton Bay ceiling fan wiring diagram to help you install your new ceiling fan. We’ll also give you a few tips on what to do if you’re having trouble understanding the diagram. So let’s get started!
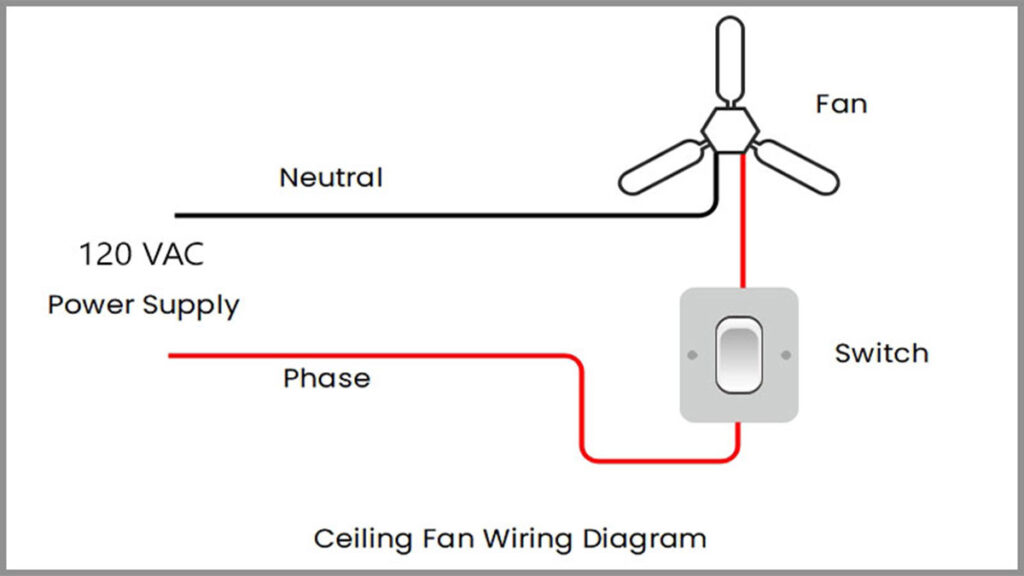
A ceiling fan wiring diagram is a simple visual representation of the wires and connections that make up your ceiling fan. It can be helpful when troubleshooting problems with your fan, or when installing a new one.
Ceiling fan wiring diagrams usually show the following:
You may also see a red wire, which is usually the fan’s speed control. Each of these components is represented by a symbol, and they are interconnected by lines to indicate which wires are connected. The diagram will also show you what size and type of wire to use for each connection.
Most ceiling fan wiring diagrams have at least four wires:
If you are installing a new ceiling fan, use the diagram to determine which wires go where. If you are troubleshooting an existing fan, use the diagram to identify which components may be causing the problem.
Ceiling fan wiring diagrams are available online and in most hardware stores. If you cannot find a diagram for your particular fan, contact the manufacturer or an electrician. Do not attempt to wire your fan without a diagram, as this can be dangerous.
Now that you know what a ceiling fan wiring diagram is and how to use it, you’ll be able to install or troubleshoot your ceiling fan with ease!
Hampton Bay standard ceiling fan wiring diagram is very popular among users because of its many features. If you are looking for an easy-to-use, user-friendly and compatible ceiling fan wiring diagram, then Hampton Bay standard ceiling fan wiring diagram is the best choice for you. It provides step-by-step instructions on how to wire your ceiling fan, which makes it very easy to follow.
Following are the notable features of Hampton Bay’s standard ceiling fan wiring diagram:
So, if you are looking for an easy-to-use, user-friendly, and compatible ceiling fan wiring diagram, then the Hampton Bay standard ceiling fan wiring diagram is the best choice for you.
Standard Hampton bay ceiling fan without a remote has an easy and straightforward ceiling fan wiring diagram.
There are four different speed settings for a Hampton Bay ceiling fan: low, medium, high, and off. The speed setting is controlled by a switch on the motor housing. To wire the ceiling fan for use with the remote control, follow the instructions that come with the remote.
Most Hampton Bay ceiling fans use standard household electrical wiring colors. If you are unsure about any of the wires, always hire a licensed electrician to do the work. Be sure to turn off the power at the circuit breaker before starting any wiring work.
You should now have a good understanding of the Hampton Bay Standard ceiling fan wiring diagram. If you still have questions, please feel free to contact us for further assistance.
Hampton Bay ceiling fan with remote control comes with a receiver inline. This receiver needs to be wired to the house current. The Hampton Bay remote control ceiling fan wiring diagram shows the power starting at the wall switch box, where a
The capacitor is used to start the motor and then fed to both switches. With this wiring, both switches will control the fan speed. However, if one switch is turned off, the other switch will still control the fan speed.
The Hampton Bay remote control ceiling fan wiring diagram also shows the paths for the red, black and blue wires. The black wire is hot and leads to the FAN MOTOR. The blue wire is for the LIGHT. And finally, the red wire goes back to the wall switch box.
If you’re like most people, ceiling fan wiring isn’t something you think about until there’s a problem. But if you’re installing a new ceiling fan, or replacing an old one, it’s important to know which wire does what.
Here’s a quick rundown of ceiling fan wire colors and what they do:
Black wires are always hot, meaning they carry live currents at all times.
These colors are sometimes used for hot wires as well, but you’ll more often see them as part of the fan’s ground wire or its speed switch connections.
Green wires are grounding wires, connecting the metal parts of the fan to each other and to the earth so that any stray electricity has a place to go. You’ll also see bare copper wires used for this purpose in some fans.
White wires are always neutral, meaning they carry current only when the circuit is complete. In a ceiling fan, the white wire is almost always connected to the light kit.
Red wires are sometimes used for hot wires, but they’re more often used as part of the fan’s speed switch connections.
Knowing which ceiling fan wire colors will help you install or replace a ceiling fan more easily and safely. So before you start working on that ceiling fan, take a few minutes to familiarize yourself with the basic wire colors and what they’re used for. It’ll make the job a lot easier – and safer – in the long run.
Ceiling fans are a great way to keep your home cool in the summer months. In order to wire your Hampton Bay ceiling fan, you will need to follow these steps:
The Hampton Bay Ceiling Fan Wiring Diagram is a great way to wire your ceiling fan. It gives you the flexibility to wire your fan the way you want it, and it also helps you save money on wiring costs.
The Hampton Bay Ceiling Fan Wiring Diagram is very easy to use. Simply find the diagram that corresponds to your ceiling fan model and follow the instructions. Second, you need to determine the best way to wire your fan. Lastly, you need to connect the wires to the correct terminals on your ceiling fan.
A: The Hampton Bay Ceiling Fan Wiring Diagram is a great way to wire your ceiling fan because it saves you money on wiring costs. Additionally, it gives you the flexibility to wire your fan the way you want it. Lastly, it ensures that your connections are made correctly.
The Hampton Bay Ceiling Fan Wiring Diagram is a very helpful and easy-to-use tool that can save you time and money. By using this diagram, you will be able to quickly and easily identify the correct wiring for your ceiling fan. This diagram will also allow you to troubleshoot any problems that you may have with your ceiling fan.
Installing a ceiling fan is a great way to improve the look of your home and stay cool during the summer months. However, if you don’t have experience with electrical work, it can be a bit daunting.
This guide will show you how to install a pre-wired ceiling fan with several wires, so you can get the job done quickly and safely.
If you followed these steps, you should now have a beautifully installed ceiling fan that will keep you cool all summer long. Congratulations!
If you have a Hampton Bay ceiling fan, you may eventually need to replace parts or the wiring diagram. Here are some tips on finding the right Hampton Bay ceiling fan replacement parts and wiring diagram.
When it comes to Hampton Bay ceiling fan replacement parts, the first thing you need to do is identify the model number of your fan. The model number can be found on the motor housing or on the blade arm. Once you have the model number, you can then go online and search for the specific parts you need.
If you need a wiring diagram, the best place to look is online. There are several websites that offer free Hampton Bay ceiling fan wiring diagrams. All you need to do is enter the model number of your fan into the search box and you should be able to find a diagram that matches your fan.
In case of any problem or support, don’t hesitate to call the Hampton Bay Customer Service Number. They will be more than happy to help you with any issue you may have.